To enable Secure Boot, access your computer’s BIOS settings and locate the Secure Boot option. Then, enable it by selecting the appropriate option and saving the changes.
Secure Boot is a feature that helps protect your computer from malware by only allowing trusted software to run during the boot process. By enabling Secure Boot, your computer verifies the signature of each piece of software before it is loaded, ensuring that it has not been tampered with or modified.
This adds an extra layer of security to your system, preventing unauthorized software from running. Enabling Secure Boot is a simple process that can be done within your computer’s BIOS settings. In this blog post, we will guide you through the steps to enable Secure Boot and enhance the security of your computer. Let’s get started!
Introduction To Secure Boot
To enable Secure Boot, access your computer’s BIOS settings and locate the Secure Boot option. Then, enable it to enhance system security against unauthorized software during the boot process. This feature verifies the digital signature of the operating system, drivers, and firmware to prevent malware attacks.
The Importance Of Secure Boot
Secure Boot is crucial for protecting your system from malware attacks.
How It Works
Secure Boot ensures that only trusted software is loaded during system startup.
Credit: softkeys.uk
Initial Preparations
How to enable Secure Boot, start by accessing the BIOS settings on your computer. Locate the Secure Boot option and enable it to enhance system security. Make sure to save changes before exiting BIOS to activate Secure Boot successfully.
Checking System Compatibility
Before enabling Secure Boot, it’s important to check if your system is compatible with it. Secure Boot requires a UEFI firmware and a 64-bit version of Windows 8 or higher. To check if your system is compatible, follow these steps:
- Press Windows key + R to open the Run dialog box.
- Type “msinfo32” and press Enter.
- Look for the “Secure Boot State” under the “System Summary” section. If it says “Unsupported” or “Off”, your system is not compatible with Secure Boot.
If your system is not compatible with Secure Boot, you may need to upgrade your hardware or switch to a different operating system.
Backup Your Data
Enabling Secure Boot can sometimes cause issues with certain hardware or software components. Therefore, it’s important to backup your data before proceeding with the Secure Boot setup. This will ensure that you don’t lose any important data in case something goes wrong. Here are some ways to backup your data:
- Use an external hard drive or USB flash drive to store your important files.
- Upload your files to a cloud storage service like Google Drive, Dropbox, or OneDrive.
- Use a backup and restore software like Acronis True Image or EaseUS Todo Backup.
Once you’ve backed up your data, you can proceed with the Secure Boot setup knowing that your data is safe and secure. Enabling Secure Boot is an important step in securing your system from malware and other security threats. By following these initial preparations, you can ensure that your system is compatible with Secure Boot and your data is backed up before proceeding with the setup.
Entering Bios Or Uefi Settings
To enable Secure Boot, access the BIOS or UEFI settings on your device. Follow the steps provided in the manufacturer’s documentation to navigate to the Secure Boot option and enable it for enhanced system security.
Entering BIOS or UEFI settings is an essential step in enabling Secure Boot on your computer. These settings allow you to configure various options related to the system’s boot process, including enabling or disabling Secure Boot. To access these settings, you need to navigate to the boot menu, which can be done by following a few simple steps. H3: Navigating to the Boot Menu To enter the boot menu, you need to restart your computer and press a specific key during the startup process.
The key may vary depending on the manufacturer of your computer or motherboard. Generally, it is one of the function keys (F1, F2, F8, F10, or F12), the Esc key, or the Delete key. Keep in mind that the key to access the boot menu might be different for BIOS and UEFI systems.
Once you have identified the correct key, follow these steps to navigate to the boot menu: 1. Start by shutting down your computer completely. 2. Press the power button to turn it back on. 3. Immediately start pressing the designated key repeatedly until the boot menu appears on the screen. 4. Use the arrow keys to navigate through the options in the boot menu. H3: Understanding BIOS vs. UEFI Before proceeding, it is important to understand the difference between BIOS (Basic Input/Output System) and UEFI (Unified Extensible Firmware Interface).
BIOS is an older firmware interface, while UEFI is the newer and more advanced replacement. UEFI provides additional features, including support for Secure Boot. To determine if your system uses BIOS or UEFI, you can check the manufacturer’s documentation or perform a quick search online. Once you know which one your system is using, you can proceed with the necessary steps to enable Secure Boot. In conclusion, entering the BIOS or UEFI settings is crucial for enabling Secure Boot on your computer.
Navigating to the boot menu allows you to access these settings and configure the necessary options. By understanding the difference between BIOS and UEFI, you can ensure that you follow the correct steps for your system. Remember to consult your computer or motherboard’s documentation for specific instructions related to your device.
Locating The Secure Boot Option
To enable Secure Boot, access the BIOS settings and locate the Secure Boot option. Enable it to enhance the security of your system by preventing unauthorized operating systems and malware from loading during the boot process. This extra layer of security helps protect your computer and data from potential threats.
Introductory paragraph: Enabling Secure Boot is an important security feature that helps protect your computer from malware attacks. However, before enabling it, you need to locate the Secure Boot option in your BIOS/UEFI settings.
In this section, we’ll discuss the different layouts in BIOS/UEFI and common locations where you can find the Secure Boot option. H3: Different Layouts in BIOS/UEFI BIOS/UEFI can have different layouts depending on the manufacturer and model of your computer. However, the Secure Boot option is usually located in the same section across all BIOS/UEFI layouts. Here are some common layouts you may encounter: Table: BIOS/UEFI Layouts | Layout | Description | |——–|————-| | Classic BIOS | A text-based interface with menus and submenus. | | UEFI | A graphical interface with icons and tabs. | | Hybrid BIOS/UEFI | A combination of both classic BIOS and UEFI interfaces. | H3: Common Locations
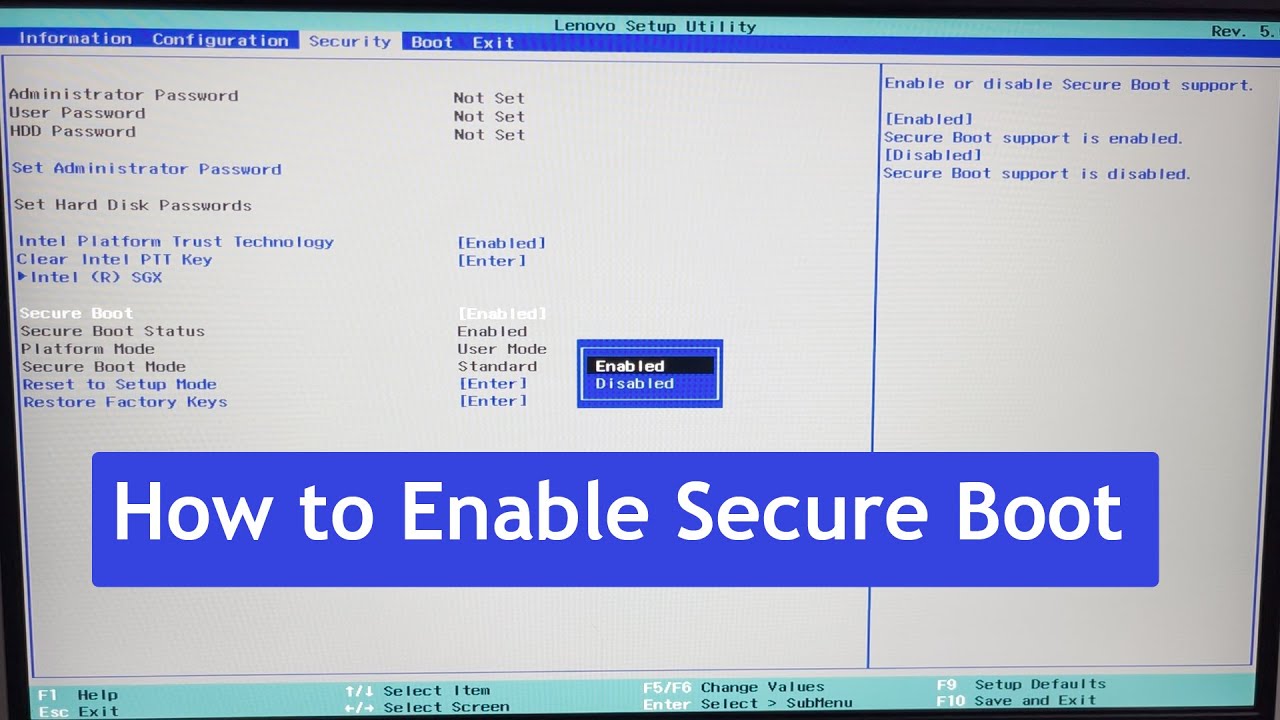
The Secure Boot option can be located in different sections of the BIOS/UEFI settings. Here are some common locations where you can find it: – Boot tab: This is the most common location for the Secure Boot option. It can be found under the Boot tab along with other boot-related settings. – Security tab: Some BIOS/UEFI layouts may have a separate Security tab where you can find the Secure Boot option. – Advanced tab: In some layouts, the Secure Boot option may be located under the Advanced tab along with other advanced settings. – System Configuration:
The Secure Boot option can also be found in the System Configuration section of some BIOS/UEFI layouts. It’s important to note that the location of the Secure Boot option may vary depending on your computer’s manufacturer and BIOS/UEFI layout. If you’re having trouble locating it, consult your computer’s manual or contact the manufacturer for assistance. In conclusion, enabling Secure Boot is an important step in securing your computer from malware attacks. By familiarizing yourself with the different layouts in BIOS/UEFI and common locations of the Secure Boot option, you can easily enable this security feature and protect your computer from potential threats.
Enabling Secure Boot
Enabling Secure Boot is an essential security measure to protect your system from unauthorized access and malware attacks. This feature ensures that only trusted software is loaded during the boot process, providing an added layer of defense for your computer. In this guide, we will walk you through the steps to enable Secure Boot on your system, ensuring that your device remains secure and protected.
Selecting Secure Boot
To enable Secure Boot, access your system’s BIOS or UEFI settings. Navigate to the boot options and locate the Secure Boot setting. Ensure that it is set to “Enabled” to activate this security feature. Once selected, save your changes and exit the BIOS or UEFI interface to proceed with the configuration.
Configuring Additional Settings
After enabling Secure Boot, it is advisable to configure additional settings to enhance the security of your system. You can create a custom list of trusted UEFI files and establish a secure boot policy to further strengthen your device’s defenses against unauthorized software and firmware.
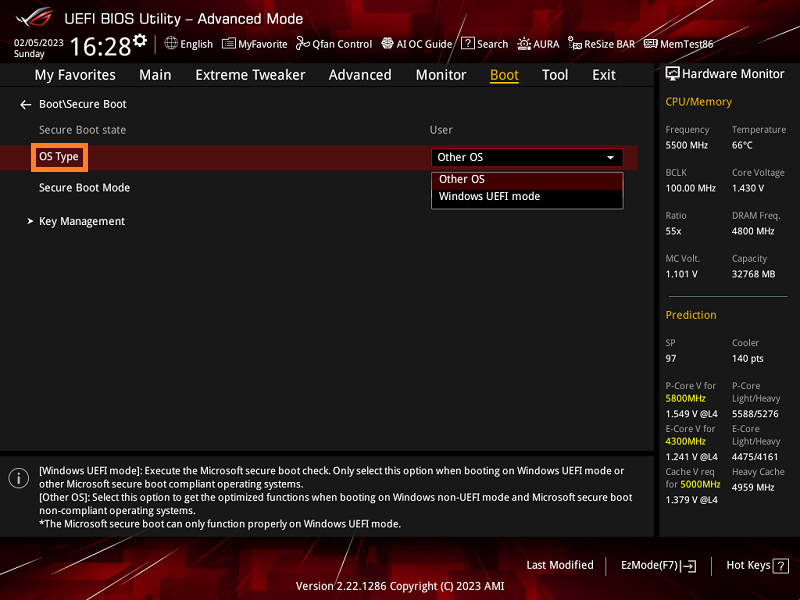
Credit: www.asus.com
Verifying Secure Boot Activation
Once you have enabled Secure Boot on your system, it is important to verify that it has been successfully activated. This step ensures that your system is protected against unauthorized firmware and software changes. In this section, we will discuss how to verify the activation of Secure Boot using system information tools and by checking the boot mode.
Using System Information Tools
To check if Secure Boot is activated on your system, you can use system information tools that provide detailed information about your computer’s hardware and software configuration. Here’s how you can do it:
- Open the system information tool on your computer. This tool is usually found in the Control Panel or can be accessed by searching for “System Information” in the Start menu.
- Navigate to the “System Summary” or similar section, where you can find detailed information about your system.
- Look for the “Secure Boot State” or similar field in the system summary. If it shows “Enabled,” then Secure Boot is successfully activated on your system.
By using the system information tools, you can quickly determine whether Secure Boot is enabled on your system or not.
Checking Boot Mode
Another way to verify Secure Boot activation is by checking the boot mode of your system. Here’s how you can do it:
- Restart your computer and enter the BIOS or UEFI settings. The method to access these settings may vary depending on your computer’s manufacturer, but it is usually by pressing a specific key during startup, such as F2 or Del.
- Navigate to the “Boot” or similar section in the BIOS or UEFI settings.
- Look for the “Secure Boot” or similar option in the boot settings. If it is set to “Enabled,” then Secure Boot is activated on your system.
Verifying the boot mode settings allows you to ensure that Secure Boot is properly enabled on your system.
By using the above methods, you can easily verify the activation of Secure Boot on your computer. This provides an extra layer of security, protecting your system from unauthorized changes and ensuring a safer computing experience.
Troubleshooting Common Issues
When enabling Secure Boot, users may encounter common problems that require troubleshooting.
Dealing With Compatibility Problems
If facing compatibility issues, check the firmware and drivers for updates.
Ensure all hardware components are Secure Boot-compatible.
Resolving Activation Errors
Activation errors can be resolved by verifying the Secure Boot configuration settings.
If the issue persists, disable Secure Boot, restart, and then re-enable it.
Maintaining System Security
To enable Secure Boot and maintain system security, follow these steps: First, access your BIOS settings. Then, locate the Secure Boot option and enable it. This will prevent unauthorized operating systems from loading during startup, ensuring your system remains secure.
Regularly Updating Firmware
Keeping your firmware up to date is crucial for system security.
Staying Informed On Security Practices
Stay informed about the latest security practices to protect your system.
:max_bytes(150000):strip_icc()/disablesecureboot02-c88e3bc90b4d466e9dd986b35da01a04.jpg)
Credit: www.lifewire.com
Frequently Asked Questions
What Is Secure Boot And Why Is It Important?
Secure Boot is a feature that ensures the integrity of the boot process, preventing unauthorized software from loading during startup. It protects against malware and rootkits, enhancing the security of the system.
How Do I Check If Secure Boot Is Enabled On My Computer?
To check if Secure Boot is enabled, restart your computer and enter the BIOS settings. Look for the Secure Boot option and verify if it’s turned on. Different computer models may have varying steps to access the BIOS settings.
Can I Enable Secure Boot On An Older Computer?
Enabling Secure Boot on an older computer depends on the system’s compatibility. Check the manufacturer’s documentation or website for information about Secure Boot support. Some older systems may not fully support Secure Boot due to hardware limitations.
What Are The Potential Issues When Enabling Secure Boot?
Enabling Secure Boot may lead to compatibility issues with certain hardware or software that are not digitally signed. It’s important to ensure that all system components and drivers are compatible with Secure Boot to avoid any unexpected problems.
Conclusion
Incorporating Secure Boot is crucial for safeguarding your system against unauthorized software. By following the simple steps outlined in this guide, you can ensure that your computer is protected from potential security threats. Embracing Secure Boot not only enhances your system’s security but also provides peace of mind.